Breeches are what brought us here to this project. Well, breeches and my ardent optimism/perennial stupidity that has made my creative motto forever be "How hard can it be?"
Hard. Very hard.
As an upfront note, I use this space almost as a journal, updating
photos and writing as I go, then publishing it when I finish. Because of this, there are things I do that I discover need to be changed as the construction process progresses. This is not a perfect tutorial by any means: it's far more like a legible version of the pencil notes you find scribbled along the margins of a pattern's instructions. Read on at your own risk.
After feeling confident about my waistcoat, I put aside those pieces and I opened Costume Close-Up. I preferred the breeches pattern in this book slightly over that of the pattern in Fitting & Proper, primarily as it looked like the sizing would be closer to my own. I ended up with an abomination of a first round of patterning. I haven't included any photos of the first attempt, as they were borderline obscene. Far too much breeches in the back, not nearly enough breeches in the front. They looked like the mullet of pants. I was practically in tears, but from laughter or frustration, I can't say.
 |
Lumped into a pile of disgust
|
I was so irritated, I switched resources entirely and moved to trying the pattern in Fitting & Proper. I had a better feeling on this pattern as I traced out the new muslin. When I got to the stage where I had abandoned the first pair, I did a try-on and a comparison between the two. The difference was dramatic. I found the breeches from Fitting & Proper to give a much better result. The shapes were more accurate, they came together better, and the fit was much, much more accurate to a real human body. Again, I did not take any photos (this time because my mirror hangs too high), so you'll have to take my word and the photo below for it.
 |
Side-by-side of the two sets of breeches during the initial mockup stage.
|
The next mistake was in making the assumption that the breeches would be fully lined, just as the waistcoat and frock coat are. Because of this, I misappropriated some of the linen I used to line the entire ditto suit, meaning that the lining is slightly hodgepodge throughout. The second mistake was struggling to understand the assembly of some of the more detailed pattern pieces. I worked up enough of the major pieces to create a muslin for fitting, but didn't dig down into the details of construction until I began to transfer my pieces to paper. I couldn't comprehend where things like the front flap facing went if the breeches fronts were already lined. It seemed too bulky. Once I sat down and really focused in on the rather sparse instructions, laying my pieces together as they would be sewn, it all clicked. It was like an "I can see the matrix" moment. It meant having to re-cut some of the lining pieces, but as project mistakes often go, I would class that as the mildest sort of mistake.
The instructions in both books are quite brief (expert knowledge required), so the internet helped me out quite a bit with assembly. There are some excellent Facebook groups for serious 18th century sewing, particularly when it comes to menswear, and also a couple of helpful Redditors in the historical clothing subs. Step one was to face the openings at the knee where buttons and buttonholes go. I used a combination of my modern and historical skills to accomplish this, so I'm not confident I did this entirely as they did in the 18th century. However, I know it's good work that will stand up to wear. In making a gown, the seam allowances are often turned under and then the pieces sewn together as they are sandwiched together. I opted to do a right-sides-together option, then prick stitched everything down so it would lay right. This step also gave it the look of a correct 18th century construction, just in case my method wasn't entirely correct.
 |
Securing the breeches facings at the lower leg opening.
|
 |
| Finished facings from the inside. The knee band will attach at the bottom, where the raw edge is. |
|
 |
Outseams being sewn. The pinned-on bit at top left is the front flap extension.
|
After getting the front flap and leg openings faced and both inseams and outseams sewn, I did a fitting. The lighting isn't great in these photos, as I took them at about 11pm after a long day of handsewing. However, you can see that there is a lot of bunching at the groin area in the top photo. I took the center seam up about 3/4 of an inch at the inseam, tapering to CF and CB. The results of the alteration are visible in the second photo.
 |
Before and after an alteration. Front edge extensions are still hanging out on the front.
|
Satisfied with my alteration, I moved forward in the process of construction. The next step was pockets. They are set in much like a modern pocket, for which I was grateful.
 |
Detail of pocket opening before topstitching and attaching waistband.
|
 |
Detail of pocket exterior before waistband and topstitching.
|
One mistake I made here, however, was that I topstitched the pocket
opening and then basted the raw edges of the exterior to the outside
pocket. These should be turned under to each other and also topstitched at this point, from the sticking-up edge of the front flap on the far left in the above image to the pocket opening on the far right (see image below).
 |
Correctly finished pocket and flap
|
The next step was to attach the waistband. Before I did this, I did another quick fitting. It revealed that the crotch area was still slightly baggy, but after referencing original paintings and the makes of others, I felt okay about it. I believed that some of the issue would be remedied when the waistband was attached (if you've ever sewn pants you know that putting on the waistband makes a world of difference in fit), but the only way to be sure was to move forward in the process. After basting on the waistband, the follow-up fitting revealed that the waistband was (as I suspected) a bit too big. I took approximately 1.25" off between the two halves, and it was a perfect fit. When I corrected the fit of the waistband, however, it exaggerated the bagginess of the crotch. Remedying this problem could be done in two ways: either by pulling the front fall over too far to each side when closing it, which caused other fit issues, or by going back and taking in the CF seam again. You can see how the two options compare below:
 |
Top: pulling the fall as tightly as it will go. Bottom: extra fabric in the CF seam pinned in.
|
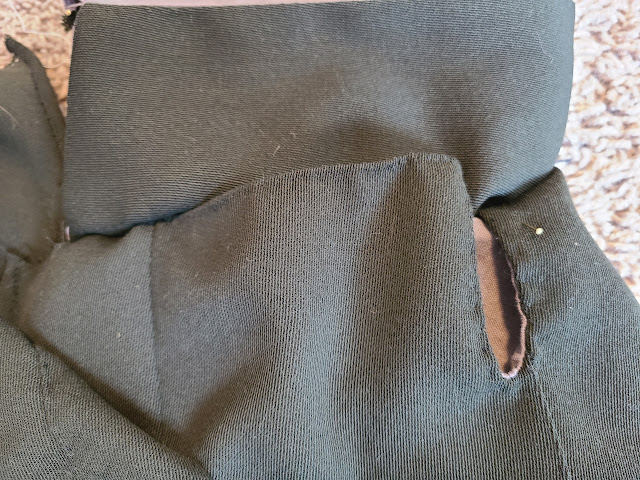
It's never the most fun to have to go back in and make an alteration you weren't expecting, but I wanted to get it right. With the fit of the fall adjusted, I was able to sew the waistbands on. I'm not quite sure what happened next, but something went terribly wrong. I sewed on the waistbands as the instructions dictated, but when I did a fitting the next morning to confirm that no changes needed made to the leg openings before I sewed on the knee bands, everything was wrong.
 |
This was the wrongest things had gone yet.
|
I had measured the waistbands perfectly, so they were the right length--they were just seemingly in the wrong place. And the baggy crotch issue had increased. I unpicked the bottoms of the front fall extensions, removed the waistbands, re-gathered the top of the breeches backs, and did some pinning to the inseam/crotch of the breeches. A quick, very stabby fitting gave me the following results:

Success at last. But to get this finished result meant I had to rip out the entire inseam and most of the breeches center front seam. To say I was disheartened was a bit of an understatement. I basted everything where I had pinned it, did another fitting, and then sewed things together. My new inseams took a huge amount of fabric from the breeches fronts, at least an inch and a half at the crotch, tapering down to the original seam allowances above the knee. After sewing things back down, pressing the seams, and doing another fitting, I was finally happy with the fit. I transferred the new markings and notes to my pattern (again, rousing cheers for me remembering to do this!) and finally moved on to the knee bands.
 |
Changes to CF seam
|
 |
Marked change in seaming line to inseam of breeches front.
|
After all of that, the knee bands were a simple piece of the equation. Interestingly, the leg openings were the only part of the entire project that gave me no trouble. The knee bands went on in no time as well, one of the benefits of sewing days with friends!
 |
Knee bands secured and marked for buckles.
|
The last step would be the closures. This included making buttons out of self fabric, stitching buttonholes, attaching knee buckles, and putting in the lacing eyelets at the center back. I used this tutorial for creating my buttons. Because the author there goes into detail and his process looks nicer, I won't go into the fine points of my button-making process here--it looks like his, but worse. I used old cast-off buttons for my blanks. If you have a lot of buttons, you're going to have a lot of singletons. I'm not the kind of person who's okay with mismatched buttons, so these oddballs accumulate with no way to ever leave my stash, like a Hotel California for sewing notions. This button-covering technique was perfect to use a few of those up.
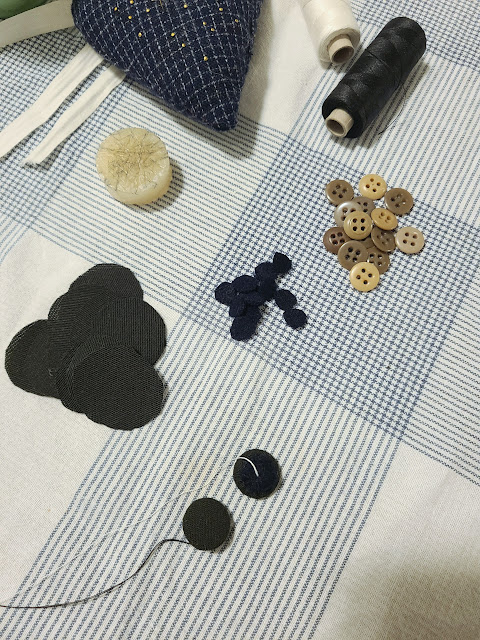 |
Supplies and two of the finished objects.
|
I realized extremely quickly that I do not, in fact, enjoy making buttons. It took me nearly a month to finish all sixteen of these, and about ten minutes to decide that I wanted to use metal buttons on other parts of the ditto suit (more on that in my waistcoat post). However, thank goodness for sewing time with friends, which made completing these far more palatable. Buttons completed, all that was left to do was attach them and make the buttonholes.
I purchased my knee buckles from Wm. Booth, Draper. They're nickel, with a simple but classic design. I really love the contrast of the silver against the deep green. I had considered waiting until Ft. Frederick to purchase them in person, as I was hoping to shade match for buttonhole twist in person as well, saving on shipping costs for everything. However, after some research, I discovered that none of the sutlers at the event would be carrying buttonhole twist in shades similar to what I needed, so I went ahead and purchased them online.

I was pleased with the design and quality of the buckles, and the sizing was perfect. I was excited to get them on the breeches, so I went ahead and used the off-color twist I had on hand to create the buttonholes to hold them. Doing so confirmed that I certainly don't want to use this color on the rest of the suit--it's far too light in anything but very low lighting. Since these holes will be completely hidden when the breeches are buckled, I'm not terribly concerned with the contrast. It was also a good opportunity to see how my practice buttonholes paid off. I won't say I'm a master, but I'm fairly satisfied with my work!
The eyelets for lacing the breeches back waistband were the last non-buttonhole piece of assembly. I used black linen thread for these--I thought it might stand up to the wear a bit better than the silk twist. Interestingly, I used to hate eyelets, but having an awl has changed my mind considerably. It's amazing what having the right tools for the job can do.
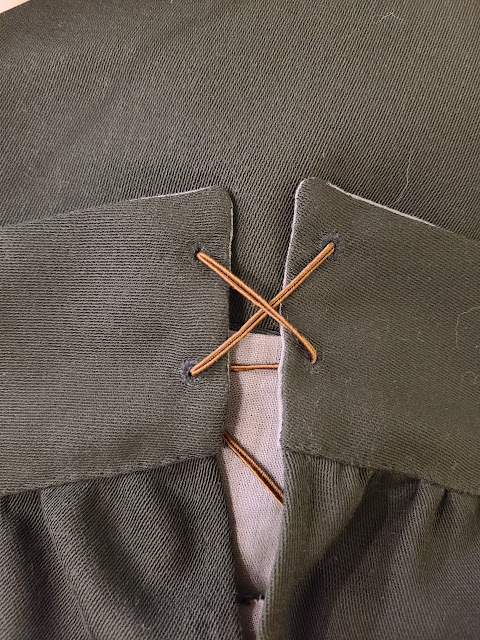 |
Testing out the eyelets with cord on hand
|
Finally it was time for the buttonholes. If I thought making buttons wasn't fun, making buttonholes was less fun. They are intricate little things, and silk twist will really show off any mistakes you make.
 |
Not pictured: the extra reinforcement placed behind the tab to prevent the tooth of the buckle from tearing the worsted. This was not in the instructions, but seemed like a good idea.
|
I didn't enjoy the buttonholes. they were intimidating, and the worsted twill really loves to fray, even with a combination of basting and use of fray check. I did about six, and then put the project aside because I was frustrated with the finished look of some of them. The heat of summer also puts a pause on sewing for me at our current place: there's no AC, and it's astonishing how having even a single garment on your lap can raise your body temperature when it's 90F inside. Then life happened, and I ended up setting this project aside until March of 2025. My husband went overseas for a month on orders, and I used this as a self-imposed deadline to complete this daunting project. Once I got going, like the buttons, they weren't really so bad. I finished the breeches buttonholes and sewed on the buttons in two evenings' work.
 |
| Buttons and buttonholes completed! |
The next steps were to finish waistcoat and coat, and then see the finished look altogether.


Comments
Post a Comment